


Connect Codex to Apify
Connect Codex to Apify in 3 steps: 1. Sign in to ApexGenius and connect Apify. 2. Add the ApexGenius plugin. 3. Start using Apify in Codex. Start in Plugins in the ChatGPT desktop app and authorize your connection.
1,000 free credits · No card required
How to connect Apify to Codex
- 1Sign in to ApexGenius and connect Apify
- 2Add the ApexGenius plugin to Codex
- 3Start using Apify in Codex
- 1
Connect Apify to ApexGenius
Connect Apify
Apify opens its own sign-in. Sign in and allow ApexGenius.
- 2
Connect ApexGenius to Codex
Choose Codex
Back on Start, pick Codex and copy the prompt.
- 3
Approve access
ApexGenius opens its approval page. Review the access, then approve.
Add the ApexGenius plugin to Codex
Codex stores MCP servers in ~/.codex/config.toml. The ChatGPT desktop app, the Codex CLI and the IDE extension share that file, so one setup covers all three on the same machine.
- In the ChatGPT desktop app, open Plugins and select an ApexGenius plugin shared with you or one you created. Connect it and authorize the app connections you intend to use.
- No plugin? Open Settings, then MCP servers, then Add server. Name it ApexGenius, choose Streamable HTTP and paste the MCP address.
- Save, select Restart, then Authenticate, and sign in to ApexGenius in your browser.
- Start a new Codex task.
The MCP address
https://server.autom8.pro/mcp
Check it. In the composer, type /mcp to view the connected servers.
Steps follow OpenAI documentation, Model Context Protocol for ChatGPT and Codex (opens in a new tab), read November 12, 2026.
Then ask Codex
Search Apify Store for an Actor that scrapes Google Maps reviews and show its price. Do not run any Actor or spend credits.
Written setup, step by stepShow
Before you start
- An account with permission to use the Apify resources you intend to connect.
1. Connect Apify to ApexGenius
- Open Apify in Connections. Choose Connect, or Add connection when offered. Give the connection a name if prompted. If Gateway setup pending appears, contact ApexGenius support before continuing.
- Choose the account and review access. Sign in to Apify in the browser and approve access for ApexGenius. Apify uses browser authorization; no Apify API token is pasted into ApexGenius.
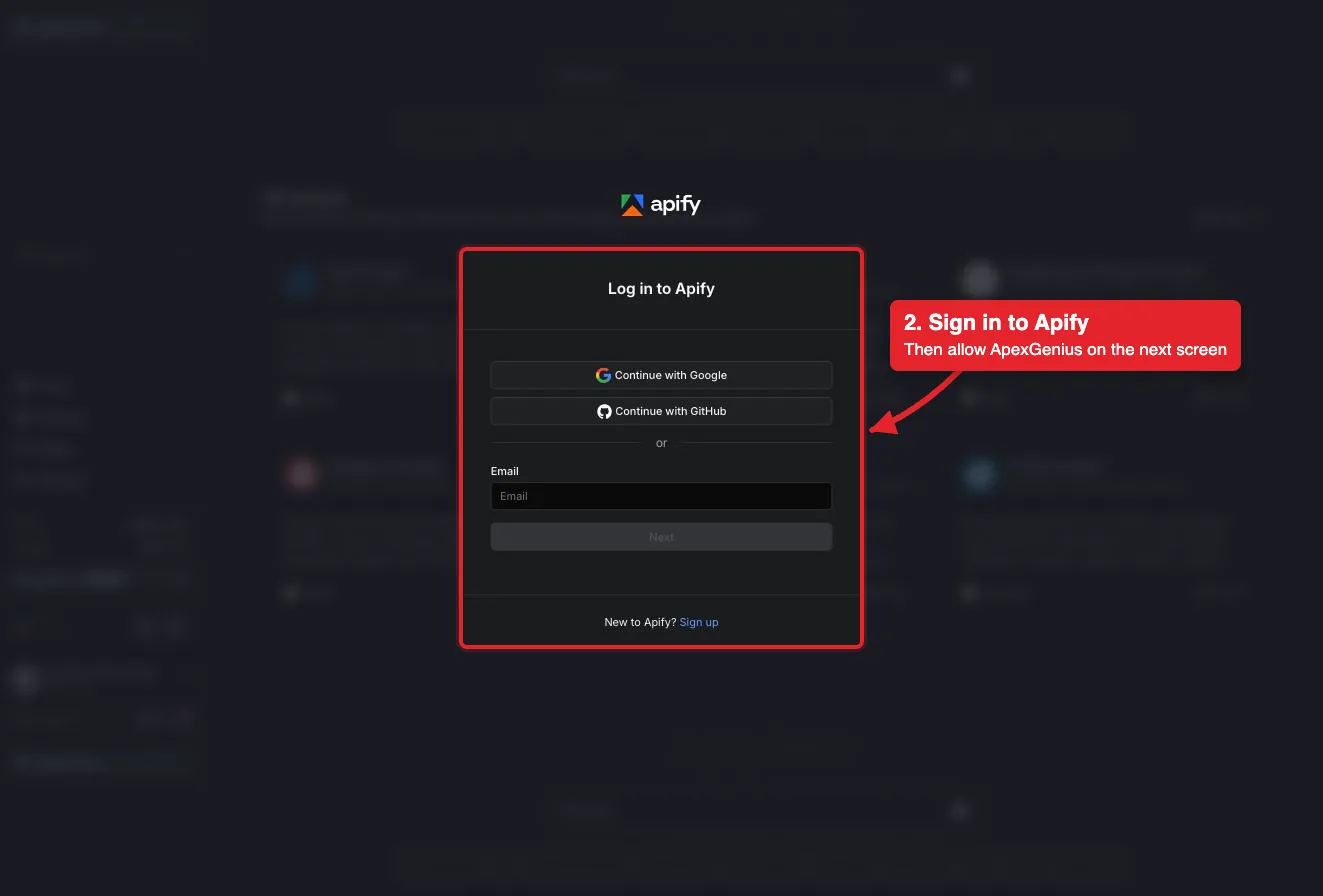
Connect opens Apify's own sign-in. Sign in with Google, GitHub or email, then allow ApexGenius.Open full-size image (opens in a new tab) - Review the connected account and resources. Confirm the connected Apify account. Open Tools to review the Apify tools. Running an Actor spends Apify credits on that account, and a run keeps going until it finishes or is stopped.
- Check the connection. Use Test connection or Check again and read the reported status. Add an AI agent from the AI agents page, choose Read only for the first test, and try the question below.
2. Connect ApexGenius to Codex
The steps are above, under Add the ApexGenius plugin to Codex. These notes apply to Codex only.
- From the terminal. The commands are under Manual setup for developers.
codex mcp listshows the configured servers, andcodex mcp login apexgeniusruns the sign-in. - Without a local browser. Run
codex mcp login apexgenius --no-browser, open the printed authorization URL on another machine, sign in, and paste the full redirect URL back into the terminal. - Asking before writes. In
config.toml,default_tools_approval_mode = "writes"on the apexgenius server makes Codex ask before any tool that is not marked read-only. - ChatGPT on the web. ChatGPT on the web does not read local Codex configuration. It uses plugins.
- Access. When ApexGenius asks what Codex may use, choose Read only for the first test, or Custom to limit it to the tools you need.
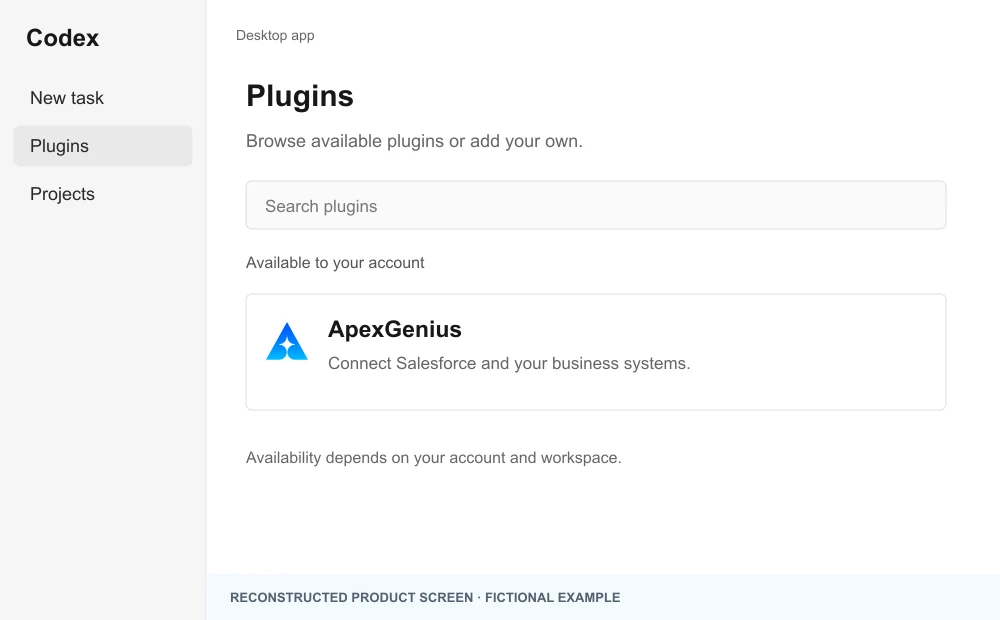
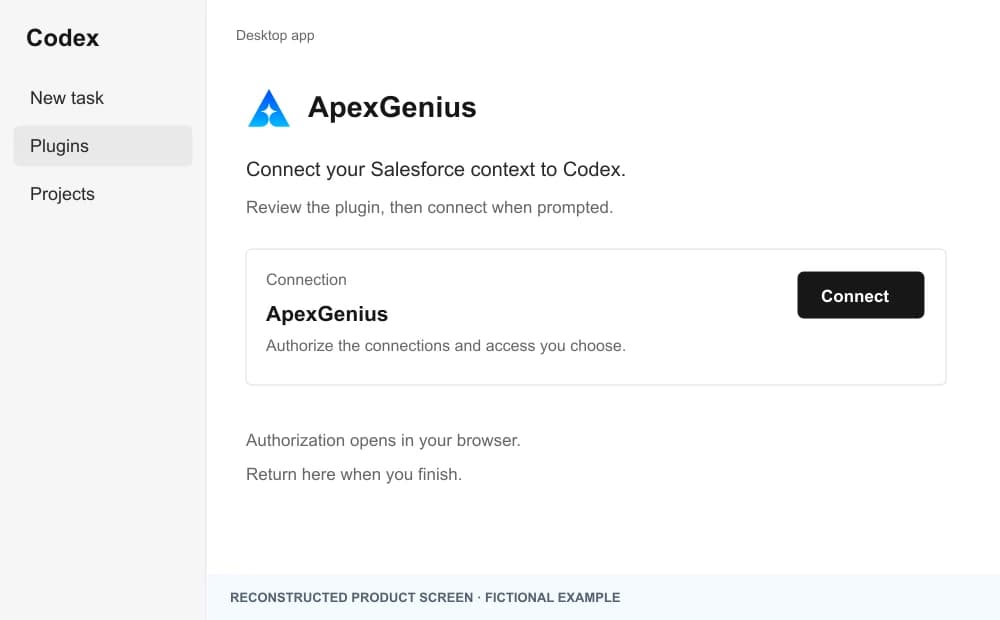
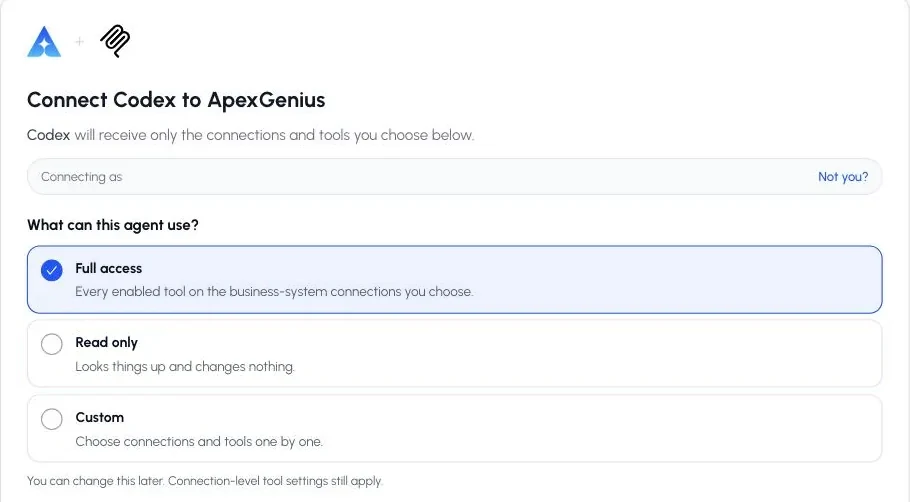
The walkthrough uses the original ChatGPT web plugin captures. After connecting, open Codex in the desktop app and start a new task with ApexGenius. A ChatGPT web connection does not verify Codex access.
A public ApexGenius plugin listing is not verified. Use a plugin shared with you or one you created, subject to your account and workspace policy.
Create a personal plugin
Where Developer mode is available, open ChatGPT Settings, then Security and login, and enable it. In Plugins, select the plus button, enter ApexGenius and a description, then add this URL under Connection. Create the connection, complete OAuth, and review the tools. Return to Codex in the desktop app and start a new task with the plugin enabled.
https://server.autom8.pro/mcpNo plugin available? Use desktop settings
- In the ChatGPT desktop app, open Settings, then MCP servers, then Add server.
- Name the server ApexGenius, choose Streamable HTTP, and paste the MCP address below.
- Save, select Restart, then Authenticate. Sign in to ApexGenius and authorize the intended connections and access.
- Start a new Codex task and ask one read-only question. Check the returned result and its matching successful read in Activity.
https://server.autom8.pro/mcpManual setup for developers
Codex CLI is optional. Run these commands, complete browser authorization, then start a new session. Do not paste bearer tokens or static authorization headers.
Register the remote MCP server
codex mcp add apexgenius --url https://server.autom8.pro/mcpAuthorize in your browser
codex mcp login apexgeniusInspect registered servers
codex mcp listThe desktop app, CLI, and IDE extension share MCP configuration on the same host. The IDE extension does not install plugins. ChatGPT web does not read local Codex configuration.
3. Verify one safe read
Search Apify Store for an Actor that scrapes Google Maps reviews and show its price. Do not run any Actor or spend credits.
Search Apify Store for an Actor that scrapes Google Maps reviews and show its price. Do not run any Actor or spend credits.Compare the returned account and resource with Apify. Check the connection status separately from the result of the first read.
Full guide: the Apify setup guide.
What it looks like in Codex
Illustration of a task, not a recorded customer result. Your answers come from the account and dates you choose.
apex_search_toolsApify Store search · Find the Apify read routeCompleteapex_call_read_toolsearch-actors · Search Apify StoreCompleteapex_call_read_toolfetch-actor-details · Read the Actor’s input and priceCompleteIllustrative example: the top match is a Google Maps reviews scraper that charges per result. Its input takes place URLs and a maximum number of reviews. Nothing was run and no credits were spent.
Read-only routeWhat to ask Codex about Apify
- Find an Actor
Search Apify Store for an Actor that scrapes Google Maps reviews and show its price. Do not run anything.
Runs
search-actors(read), thenfetch-actor-details(read). - Check a run
Show the status of this Apify run and where its results are stored.
Runs
get-actor-run(read). - Read results
Read the first 20 results from the dataset of this run, with only the title and URL fields.
Runs
get-actor-run(read), thenget-dataset-items(read).
These 3 questions use 4 of Apify’s 11 operations. The full list is below.
- Run the Website Content Crawler on this one URL. Show me the input and the price first. (write)
- Stop the run I just started and tell me what it produced so far. (write)
What Codex can do in Apify
11 operations: 7 read, 4 write. Read looks things up and changes nothing. Writes change Apify and run only when you turn them on.
Find an Actor
2 readsearch-actorsreadSearch Apify Store for Actors by keyword. Starts no run.
fetch-actor-detailsreadRead one Actor’s input schema, output, README and price.
Run an Actor
3 writecall-actorwriteRun any Actor with your input. Waits up to 45 seconds, then returns the run status and storage IDs.
apify--rag-web-browserwriteRun the RAG Web Browser Actor: search the web and read the top pages.
apify--web-fetchwriteRun the Web Fetch Actor: fetch one URL and return its content.
Runs and results
3 readget-actor-runreadRead one run’s status and storage IDs.
get-dataset-itemsreadRead a run’s results from its dataset, with limit, offset and field filters.
get-key-value-store-recordreadRead one saved record, such as OUTPUT, from a key-value store.
Stop a run
1 writeabort-actor-runwriteStop a run. A stopped run cannot be resumed, and credits already spent are not refunded.
Apify documentation
2 readsearch-apify-docsreadSearch the Apify documentation.
fetch-apify-docsreadRead one Apify documentation page by its URL.
You choose the access. When you approve Codex, pick Full access, Read only, or Custom.
One connection is one Apify account. Apify grants full API access to that account; ApexGenius tool controls limit what your AI can call.
Reads go through a read-only route that checks Apify’s live labels. Running an Actor spends Apify credits, and runs and stops happen right away when enabled.
ApexGenius loads Apify’s default tool set. Run lists, run logs, storage lists, saved tasks, schedules and builds are not included.
Disconnecting stops future access. It does not stop a run that is already going, refund credits, or delete results.
Questions about connecting Codex to Apify
Updated November 12, 2026.
How do I connect Codex to Apify?
Sign in to ApexGenius and connect Apify. In the ChatGPT desktop app, open Plugins and connect an ApexGenius plugin, or open Settings, then MCP servers, then Add server, and add the ApexGenius MCP address as a Streamable HTTP server. Then ask Codex: “Search Apify Store for an Actor that scrapes Google Maps reviews and show its price. Do not run any Actor or spend credits.” Start with a read, so nothing changes.
How do I check that Codex can use Apify?
In the Codex composer, type /mcp to view the connected servers. ApexGenius should be listed. If it asks for sign-in, open Settings, then MCP servers, and select Authenticate. Start a new task, then ask: “Search Apify Store for an Actor that scrapes Google Maps reviews and show its price. Do not run any Actor or spend credits.”
Does running an Actor cost money?
Yes. Actor runs spend Apify credits on your account. Some Actors charge per result or event, others for the compute they use, and reading results can use a little platform usage. Your AI can read an Actor’s price before it runs anything.
How do I stop a run?
Ask your AI to stop it. It calls abort-actor-run with the run ID. You can also open the run in Apify Console and choose Abort. A stopped run cannot be resumed.
Can I undo a run?
No. Credits already spent are not refunded, and anything an Actor fetched or sent to other sites cannot be taken back. Results stay in your Apify account until you delete them in Apify Console.
Which Apify tools are included?
Apify’s default hosted set: Store search, Actor details, running an Actor, the RAG Web Browser and Web Fetch Actors, run status, results, stopping a run, and Apify docs. Run lists, logs, schedules and saved tasks are not included.
More connections like this one
Codex with other apps
 n8n
 Supabase
 Mobbin
 Cal.com
 Slack
 Discord
 ChatGPT Ads
 GitHub
All 48 apps Codex can use
 Stripe
 Context.dev
 Attio
 Semrush
 Notion
 Linear
 Jira
 HQ Rental
 Google Ads
 Google Analytics
 Google Forms
 Google Meet
 Google Tasks
 Gmail
 Google Calendar
 Google Chat
 Google Docs
 Google Drive
 Google Sheets
 Google Slides
 Apollo
 Blotato
 Bing Webmaster
 Calendly
 ClickUp
 monday.com
 Atlassian Rovo
 Polymarket
 OP.GG
 YouTube
- YouTube Analytics
 Salesforce
 Confluence
 Google Search Console
 ElevenLabs
 FreshBooks
 Trello
 GitLab
 TypeSafe
 HubSpot
 Claude
 Grok Bot
 Muse
Connect Apify to Codex today
Start free1,000 free credits. No card required. Disconnect any time.