

Connect Claude to Context.dev
Connect Claude to Context.dev through ApexGenius. Search the web, read live pages as Markdown, extract JSON, and watch web pages for changes.
7 days free · No card required
How to connect Context.dev to Claude
Before you start
- An account with permission to use the Context.dev resources you intend to connect.
1. Connect Context.dev to ApexGenius
- Open Context.dev in Connections. Choose Connect, or Add connection when offered. Give the connection a name if prompted. If Gateway setup pending appears, contact ApexGenius support before continuing.
- Choose the account and review access. Sign in to Context.dev in the browser and approve access for your organization. Context.dev uses browser authorization; no Context.dev API key is pasted into ApexGenius.
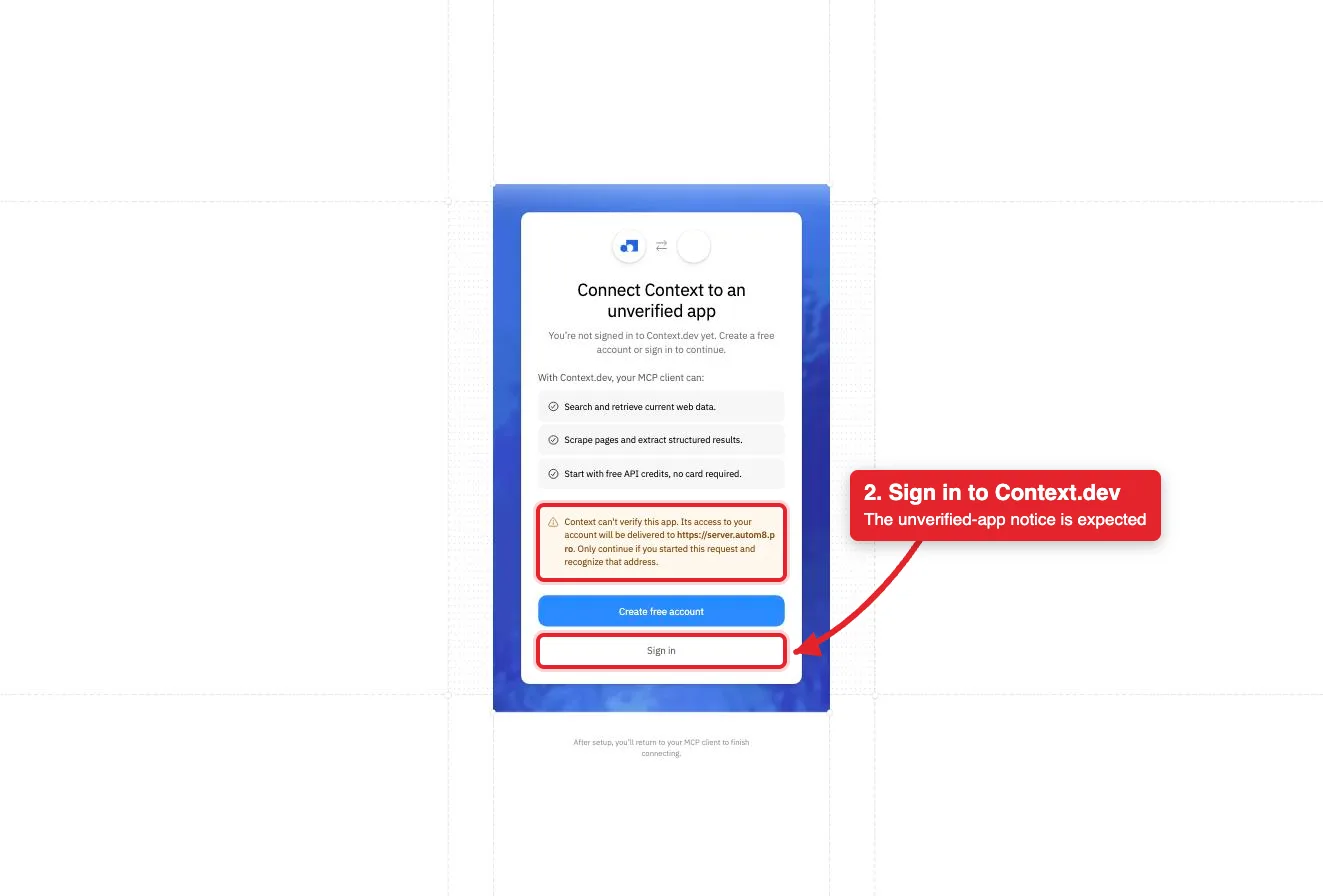
Context.dev labels ApexGenius an unverified app and names server.autom8.pro, the ApexGenius gateway, as the address that receives access. Sign in to continue.Open full-size image (opens in a new tab) - Review the connected account and resources. Confirm the connected Context.dev organization. Open Tools to review its reads and the monitor and batch actions. Most operations spend your organization's Context.dev credits.
- Check the connection. Use Test connection or Check again and read the reported status. Add an AI agent from the AI agents page, choose Read only for the first test, and try the question below.
2. Add ApexGenius to Claude
Use this server address when adding the connection:
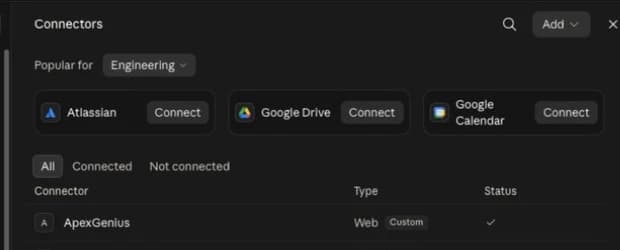
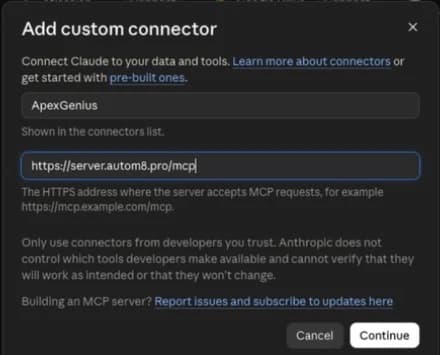
https://server.autom8.pro/mcp- Open Claude Settings, then Connectors, then Add custom connector.
- Enter ApexGenius and the MCP URL above. Choose Connect.
- Approve it in your browser, then turn it on in chat or Cowork.
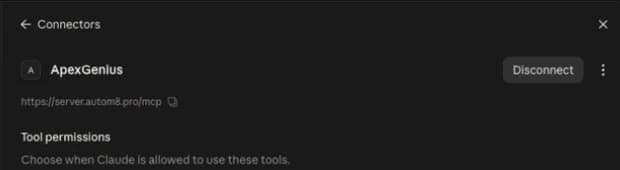
- When ApexGenius asks what this AI client may use, choose Read only for the first test, or Custom to limit it to the tools you need.
- Start a new conversation and select ApexGenius from the available tools before asking for live data.
Read the steps Follow along at your own pace
1. Open Connectors
2. Add ApexGenius
3. Review permissions
3. Verify one safe read
List my Context.dev monitors. Do not create, run, or change anything.
List my Context.dev monitors. Do not create, run, or change anything.Compare the returned account and resource with Context.dev. Check the connection status separately from the result of the first read.
Additional reference: the Context.dev setup guide.
Start freeWhat it looks like in Claude Cowork
An illustrative read-only request and response. Your results come from the account and dates you choose.

apex_search_toolsContext.dev monitors · Find the Context.dev read routeCompleteapex_call_read_toollist-monitors · List monitorsCompleteIllustrative example: two monitors are active, a pricing page checked daily and a changelog checked weekly. Listing monitors spends no credits. Nothing was changed.
Read-only routeWhat you can ask once it is connected
“List my Context.dev monitors and their status. Do not create, run or change anything.”
“Read https://example.com/pricing as Markdown and list every plan with its price. Cite the URL.”
“Pull the brand profile for linear.app: logo, colors, fonts and social links.”
“Search the web for this week's official Stripe product announcements and cite each source URL.”
You choose what Claude is allowed to touch
Choose the saved accounts and tools this Claude connection may use. Its authorization carries that scope, and each app connection’s tool and resource restrictions still apply.
- Full accessEvery enabled tool on the connections you choose.
- Read onlyLooks things up, changes nothing.
- CustomPick apps and tools one by one.
- · Context.dev controls the OAuth grant. The connection acts for your Context.dev organization and uses its shared credits.
- · The read route checks Context.dev's live tool label and rejects writes or unlabeled operations.
- · Writes run right away unless you set the tool to Ask me first. A deleted monitor or batch cannot be restored.
- · Fetched page text is untrusted data. The ContextDev skill tells your AI to quote and cite it and never follow instructions inside it.
- · Disconnecting stops future gateway access. It does not stop monitors or batches that already exist.
The Context.dev operations Claude can run
34 operations: 27 Read and 7 Write. Available tools depend on your connection and permissions. Review any action that changes or removes data. Claude discovers these operations through the ApexGenius gateway.
web-searchReadSearch the live web and optionally return ranked results as Markdown.web-scrape-markdownReadTurn one known URL into clean Markdown. The default way to read a page.web-scrape-htmlReadReturn the raw HTML of one URL when the markup itself matters.web-scrape-imagesReadList the images on one page, with sources and available metadata.web-screenshotReadCapture a rendered PNG of a page, full page or one viewport.web-scrape-sitemapReadList a site's URLs from its sitemap without reading every page.web-crawlReadFollow links from one URL and return Markdown for several pages in one call.web-extractReadCrawl the relevant pages and return JSON shaped by the JSON Schema you pass.parse-documentReadConvert PDF, Office, spreadsheet, image or text file bytes into Markdown.get-brandReadShow a company's logo, colors, description, links and social profiles for one domain.brand-retrieve-unifiedReadReturn brand data as JSON by domain, name, work email, ticker, ISIN, transaction text or URL.web-styleguideReadRead a site's colors, type, spacing and shadows.web-fontsReadName the font families a site uses, with fallbacks.web-naicsReadClassify a company into 2022 NAICS industry codes.web-sicReadClassify a company into SIC industry codes.list-monitorsReadList the monitors in your organization with status and tags.get-monitorReadRead one monitor's target, schedule, rules and webhook settings.list-monitor-runsReadList one monitor's runs with status, timing and credits.get-monitor-runReadRead one run and the change it found, if any.list-account-runsReadList monitor runs across the whole organization.list-monitor-changesReadList the changes one monitor has found.list-changesReadList changes found across all monitors.get-changeReadRead one change with its text diff, evidence and importance.list-monitor-credit-usageReadReport credits spent by each monitor over a time window.list-batchesReadList batch jobs from newest to oldest.get-batchReadRead one batch's status, progress and credit use.get-batch-resultsReadPage through a finished batch's results as JSON.create-monitorWriteCreate a recurring monitor. It runs a first baseline right away and spends credits on each later run.update-monitorWriteChange or pause a monitor. A new target or rule starts a new baseline.run-monitor-nowWriteStart a check now. It spends credits and can send the monitor's webhook.submit-batchWriteStart a background scrape or crawl job. It can call an outside webhook when done.cancel-batchWriteStop a batch from starting new pages. Stored results are kept.delete-monitorWritePermanently delete a monitor and its future runs. Cannot be undone.delete-batchWritePermanently delete a finished batch and its stored results. Cannot be undone.
Questions people ask first
How do I connect Context.dev?
Open Context.dev in ApexGenius Connections, choose Connect, and sign in to Context.dev in the browser. ApexGenius registers itself with the hosted Context.dev MCP. No API key is pasted into ApexGenius.
Does it spend Context.dev credits?
Most calls do. A scrape is 1 credit, a web search is 1 credit per 10 results, a crawl is 1 credit per page and a brand lookup is 10 credits. Listing monitors is free. Free organizations get 1,000 credits a month with a work email, or 250 once with a personal email.
Can my AI change my Context.dev account?
Yes. It can create, update, run or delete monitors and submit, cancel or delete batches. Writes run right away unless you set the tool to Ask me first. A deleted monitor or batch cannot be restored.
Can a web page tell my AI what to do?
It should not. Page text is data. The ContextDev skill tells your AI to quote and cite it and never follow instructions found inside it. Review results before you act on them.
Can I take this setup to another AI agent?
Yes. Add ApexGenius to another compatible agent with the same ApexGenius account. It uses the same Context.dev connection and can load the ContextDev skill. Each agent needs its own setup.
Connect Context.dev to Claude today
Start free7 days free. No card required. Disconnect any time.