


Connect Cursor to Calendly
Connect Cursor to Calendly in 3 steps: 1. Sign in to ApexGenius and connect Calendly. 2. Add the ApexGenius MCP server. 3. Start using Calendly in Cursor.
1,000 free credits · No card required
How to connect Calendly to Cursor
- 1Sign in to ApexGenius and connect Calendly
- 2Add the ApexGenius MCP server to Cursor
- 3Start using Calendly in Cursor
- 1
Connect Calendly to ApexGenius
Connect Calendly
Calendly opens its own sign-in. Sign in and allow ApexGenius.
- 2
Connect ApexGenius to Cursor
Choose Cursor
Back on Start, pick Cursor and copy the prompt.
- 3
Approve access
ApexGenius opens its approval page. Review the access, then approve.
Add the ApexGenius MCP server to Cursor
Cursor reads MCP servers from ~/.cursor/mcp.json for every project, or from .cursor/mcp.json inside one project. The Customize page manages the same servers.
- Add the apexgenius entry to
mcpServers. Keep any servers already there. - Open Customize in Cursor, find apexgenius and choose Connect.
- Approve ApexGenius in your browser.
{
  "mcpServers": {
    "apexgenius": {
      "url": "https://server.autom8.pro/mcp"
    }
  }
}
Check it. Cursor lists a connected server’s tools under Available Tools. By default it asks for your approval before it runs one.
Steps follow Cursor documentation, Model Context Protocol (MCP) (opens in a new tab), read November 12, 2026.
Then ask Cursor
Show my connected Calendly user and list my scheduled meetings for the next seven days. Do not book, cancel or change anything.
Written setup, step by stepShow
Before you start
- An account with permission to use the Calendly resources you intend to connect.
1. Connect Calendly to ApexGenius
- Open Calendly in Connections. Choose Connect, or Add connection when offered. Give the connection a name if prompted. If Gateway setup pending appears, contact ApexGenius support before continuing.
- Choose the account and review access. Sign in to Calendly in the browser and allow access for your Calendly user. Calendly uses browser authorization; there is no API key to paste.
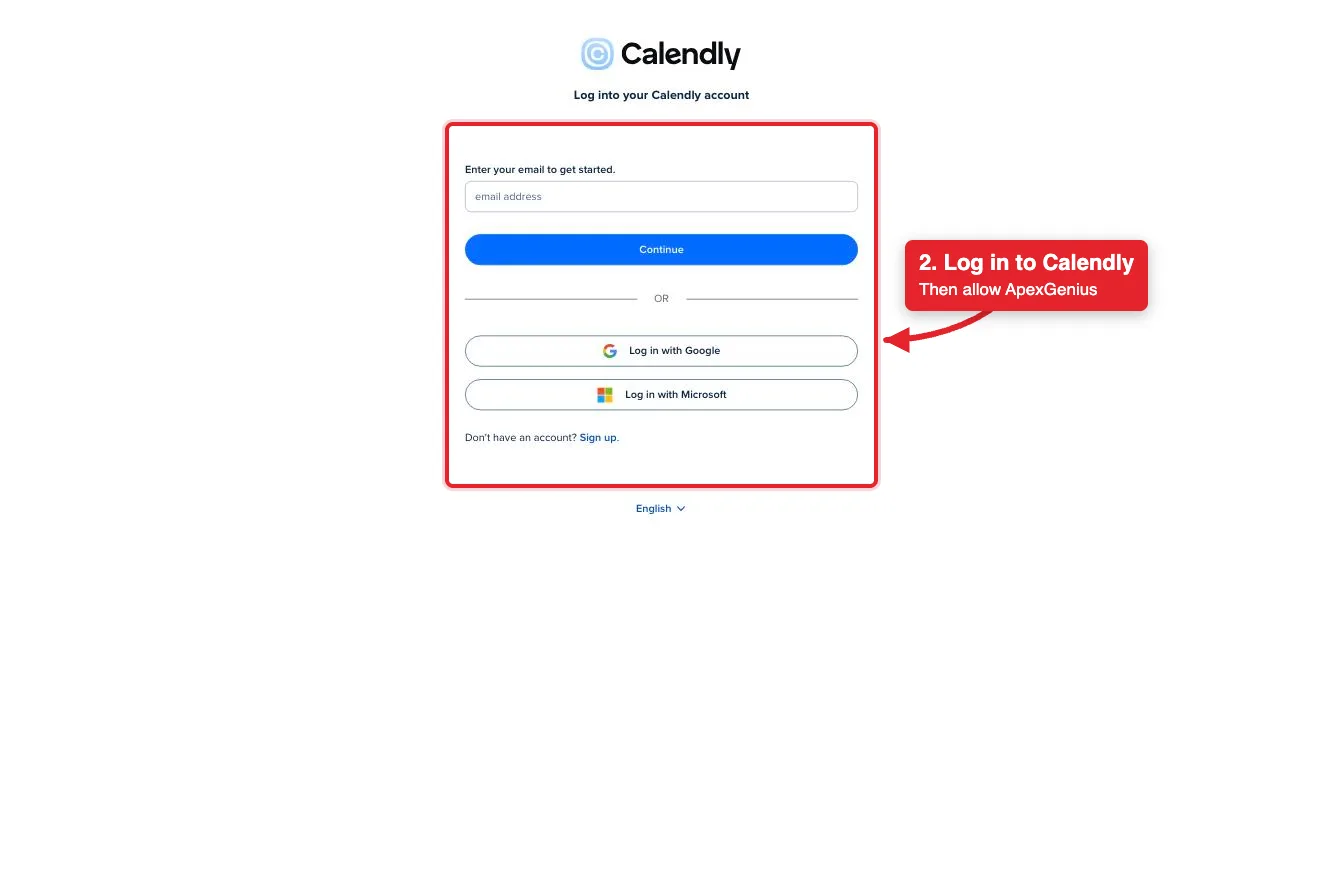
Connect opens Calendly's login. Log in with email, Google or Microsoft, then allow ApexGenius.Open full-size image (opens in a new tab) - Review the connected account and resources. Confirm the connected Calendly user. Open Tools to review the meeting and event type actions. Booking or cancelling a meeting emails the invitees.
- Check the connection. Use Test connection or Check again and read the reported status. Add an AI agent from the AI agents page, choose Read only for the first test, and try the question below.
2. Connect ApexGenius to Cursor
Use this server address when adding the connection:
https://server.autom8.pro/mcpThe steps are above, under Add the ApexGenius MCP server to Cursor. These notes apply to Cursor only.
- No client ID or secret. Cursor signs in with OAuth and registers itself with ApexGenius, so
mcp.jsonneeds only the address. - Enterprise teams. An MCP allowlist can limit which server addresses run. If apexgenius does not connect on a team account, ask your Cursor admin to allow the ApexGenius address.
- Turning it off. Enable or disable the server from Customize in the sidebar.
- Access. When ApexGenius asks what Cursor may use, choose Read only for the first test, or Custom to limit it to the tools you need.
3. Verify one safe read
Show my connected Calendly user and list my scheduled meetings for the next seven days. Do not book, cancel or change anything.
Show my connected Calendly user and list my scheduled meetings for the next seven days. Do not book, cancel or change anything.Compare the returned account and resource with Calendly. Check the connection status separately from the result of the first read.
Full guide: the Calendly setup guide.
What it looks like in Cursor
Illustration of a task, not a recorded customer result. Your answers come from the account and dates you choose.

apex_search_toolsCalendly user · Find the Calendly read routeCompleteapex_call_read_toolusers-get_current_user · Read the connected userCompleteIllustrative example: the connected user is Alex Rivera in America/New_York. Compare this user with the Calendly account you authorized before asking about meetings.
Read-only routeWhat to ask Cursor about Calendly
- Check the user
Show my connected Calendly user and time zone. Do not change anything.
Runs
users-get_current_user(read). - List meetings
List my scheduled Calendly meetings for the next seven days with invitee names.
Runs
users-get_current_user(read), thenmeetings-list_events(read), thenmeetings-list_event_invitees(read). - Find open times
Find open times next week for my 30 minute Calendly event type.
Runs
event_types-list_event_types(read), thenevent_types-list_event_type_available_times(read).
These 3 questions use 5 of Calendly’s 36 operations. The full list is below.
- Cancel the Calendly meeting I name. Show me the meeting and who will get an email first. (write)
What Cursor can do in Calendly
36 operations: 25 read, 11 write. Read looks things up and changes nothing. Writes change Calendly and run only when you turn them on.
Account and team
6 read · 2 writeusers-get_current_userreadRead the connected user: name, email, time zone and scheduling link.
users-get_userreadRead one Calendly user.
organizations-get_organizationreadRead the organization the user belongs to.
organizations-list_organization_membershipsreadList the members of the organization.
organizations-get_organization_membershipreadRead one membership and its role.
organizations-list_organization_invitationsreadList pending invitations to the organization.
organizations-create_organization_invitationwriteInvite someone to the organization. Calendly emails them.
organizations-revoke_organization_invitationwriteWithdraw a pending invitation. The email was already sent.
Event types
2 read · 2 writeevent_types-list_event_typesreadList event types for a user or the organization.
event_types-get_event_typereadRead one event type: length, location and booking link.
event_types-create_event_typewriteCreate a new event type people can book.
event_types-update_event_typewriteChange an event type, such as its name or length.
Availability
6 read · 1 writeevent_types-list_event_type_available_timesreadList open start times for one event type in a date range.
availability-list_user_busy_timesreadList busy blocks for a user in a date range.
availability-list_user_availability_schedulesreadList a user's working-hours schedules.
availability-get_user_availability_schedulereadRead one working-hours schedule.
event_types-list_event_type_availability_schedulereadRead the schedule behind one event type.
event_types-update_event_type_availability_schedulewriteChange the hours an event type can be booked.
locations-list_user_meeting_locationsreadList the meeting locations a user has set up.
Meetings and invitees
4 read · 2 writemeetings-list_eventsreadList scheduled meetings in a date range.
meetings-get_eventreadRead one scheduled meeting.
meetings-list_event_inviteesreadList the invitees of a meeting with their answers.
meetings-get_event_inviteereadRead one invitee.
meetings-create_inviteewriteBook a meeting on an event type. Needs a paid Calendly plan and emails the invitee.
meetings-cancel_eventwriteCancel a scheduled meeting and email its invitees. It cannot be restored.
No-shows
1 read · 2 writemeetings-get_invitee_no_showreadRead a no-show mark.
meetings-create_invitee_no_showwriteMark an invitee as a no-show.
meetings-delete_invitee_no_showwriteRemove a no-show mark.
Booking links
2 writescheduling_links-create_single_use_scheduling_linkwriteCreate a single-use booking link for an event type.
shares-create_sharewriteCreate a single-use link with custom times or length.
Routing forms
4 readrouting_forms-list_routing_formsreadList routing forms.
routing_forms-get_routing_formreadRead one routing form and its questions.
routing_forms-list_routing_form_submissionsreadList answers submitted to a routing form.
routing_forms-get_routing_form_submissionreadRead one submission.
Calendly skills
2 readlist_calendly_skillsreadList the skills Calendly publishes.
load_calendly_skillreadRead one Calendly skill.
You choose the access. When you approve Cursor, pick Full access, Read only, or Custom.
Calendly uses the permissions of the connected user. An organization admin can see more of the organization than a member can.
The read route checks Calendly’s live tool label and rejects writes or unlabeled operations.
Writes run right away when enabled. Booking or cancelling a meeting emails the invitees, and a cancelled meeting cannot be restored.
Booking a meeting needs a paid Calendly plan. Routing forms need a Calendly Teams plan or higher.
Disconnecting stops future gateway access. It does not undo a meeting that was booked or cancelled.
Questions about connecting Cursor to Calendly
Updated November 12, 2026.
How do I connect Cursor to Calendly?
Sign in to ApexGenius and connect Calendly. In Cursor, add an apexgenius entry with the ApexGenius MCP address to mcpServers in ~/.cursor/mcp.json, then choose Connect on the Customize page. Then ask Cursor: “Show my connected Calendly user and list my scheduled meetings for the next seven days. Do not book, cancel or change anything.” Start with a read, so nothing changes.
How do I check that Cursor can use Calendly?
Open Customize in Cursor and find apexgenius among the MCP servers. Its tools should appear under Available Tools. If it is listed but not connected, choose Connect and finish the browser sign-in. On an Enterprise team, the MCP allowlist may need the ApexGenius address. Then ask: “Show my connected Calendly user and list my scheduled meetings for the next seven days. Do not book, cancel or change anything.”
Which meetings can my AI see?
The meetings, event types and invitees your connected Calendly user can see. An organization admin can see more of the organization than a member can.
Can my AI book or cancel a meeting?
Yes. Both run right away when enabled, and Calendly emails the invitees. A cancelled meeting cannot be restored; the only undo is a new booking.
Do I need a paid Calendly plan?
Booking a meeting through Calendly’s scheduling API needs a paid Calendly plan, and routing forms need a Teams plan or higher. Other operations follow your Calendly account’s limits.
Is this the same as Cal.com?
No. Calendly and Cal.com are separate products. This connector reaches Calendly only, through Calendly’s own hosted MCP.
More connections like this one
Cursor with other apps
 Supabase
 Cal.com
 GitHub
 Stripe
 Linear
 Jira
 HQ Rental
 Google Forms
All 48 apps Cursor can use
 Google Tasks
 Google Calendar
 Google Sheets
 ClickUp
 monday.com
 ElevenLabs
 FreshBooks
 Trello
 GitLab
 Mobbin
 Slack
 Discord
 ChatGPT Ads
 Context.dev
 Attio
 Semrush
 Notion
 Apify
 Google Ads
 Google Analytics
 Google Meet
 Gmail
 Google Chat
 Google Docs
 Google Drive
 Google Slides
 Apollo
 Blotato
 Bing Webmaster
 Atlassian Rovo
 Polymarket
 OP.GG
 YouTube
- YouTube Analytics
 Salesforce
 n8n
 Confluence
 Google Search Console
 TypeSafe
 HubSpot
 Claude
 Grok Bot
 Muse
Connect Calendly to Cursor today
Start free1,000 free credits. No card required. Disconnect any time.