


Connect ChatGPT to GitHub
Connect ChatGPT to GitHub in 3 steps: 1. Sign in to ApexGenius and connect GitHub. 2. Add the ApexGenius plugin. 3. Start using GitHub in ChatGPT.
1,000 free credits · No card required
How to connect GitHub to ChatGPT
- 1Sign in to ApexGenius and connect GitHub
- 2Add the ApexGenius plugin to ChatGPT
- 3Start using GitHub in ChatGPT
- 1
Connect GitHub to ApexGenius
Connect GitHub
GitHub opens its own sign-in. Sign in and allow ApexGenius.
- 2
Choose your repositories
Pick the repositories your AI may use. Add more later from the connection page.
- 3
Connect ApexGenius to ChatGPT
Choose ChatGPT
Back on Start, pick ChatGPT and copy the prompt.
- 4
Add it in ChatGPT
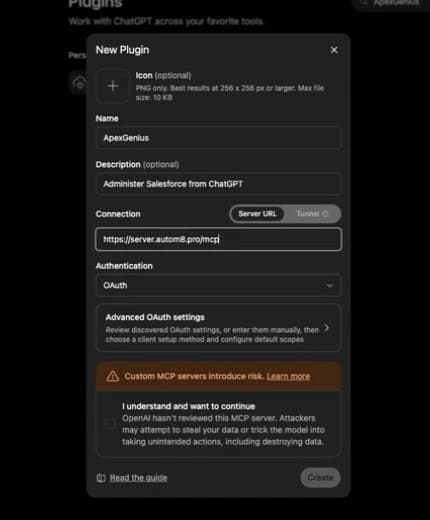
In ChatGPT, open Settings, then Plugins, then Create. Paste the address, keep OAuth.
- 5
Approve access
ApexGenius opens its approval page. Review the access, then approve.
Add the ApexGenius plugin to ChatGPT
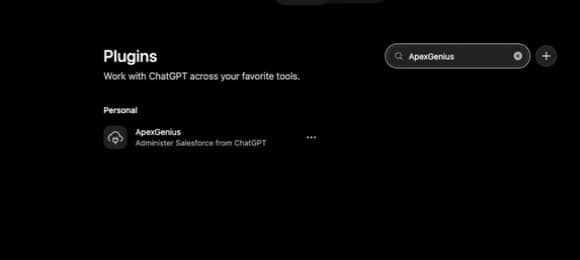
ChatGPT adds a custom MCP server as a plugin, under Plugins. There is no config file.
- Go to ChatGPT Plugins, select the plus button, then Add custom MCP server.
- Enter the name ApexGenius and a description. Under Connection, enter the MCP address, including the
/mcppath. - Configure authentication, review the risk warning and select I understand and want to continue. Select Create as a plugin.
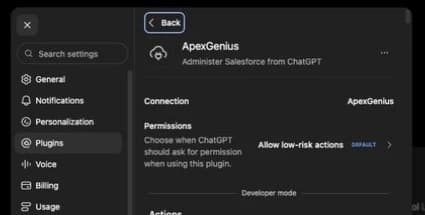
- Complete the ApexGenius sign-in, approve access, and review the tools ChatGPT found.
The MCP address
https://server.autom8.pro/mcp
Check it. Start a new conversation, type @ in the prompt box and select the ApexGenius plugin.
Steps follow OpenAI Developers, Connect and test your plugin (opens in a new tab), read November 12, 2026.
Then ask ChatGPT
Using GitHub, tell me which GitHub account is connected, then read the README of the repository I name. Do not change anything.
Written setup, step by stepShow
Before you start
- A GitHub account that can read the repositories you want your AI to use.
- For a repository owned by an organization, an owner who can approve the ApexGenius Connect app.
- ChatGPT developer mode must be available to your account and allowed by your workspace.
1. Connect GitHub to ApexGenius
- Open GitHub in Connections. Sign in to ApexGenius, open Connections, choose GitHub, and select Connect.
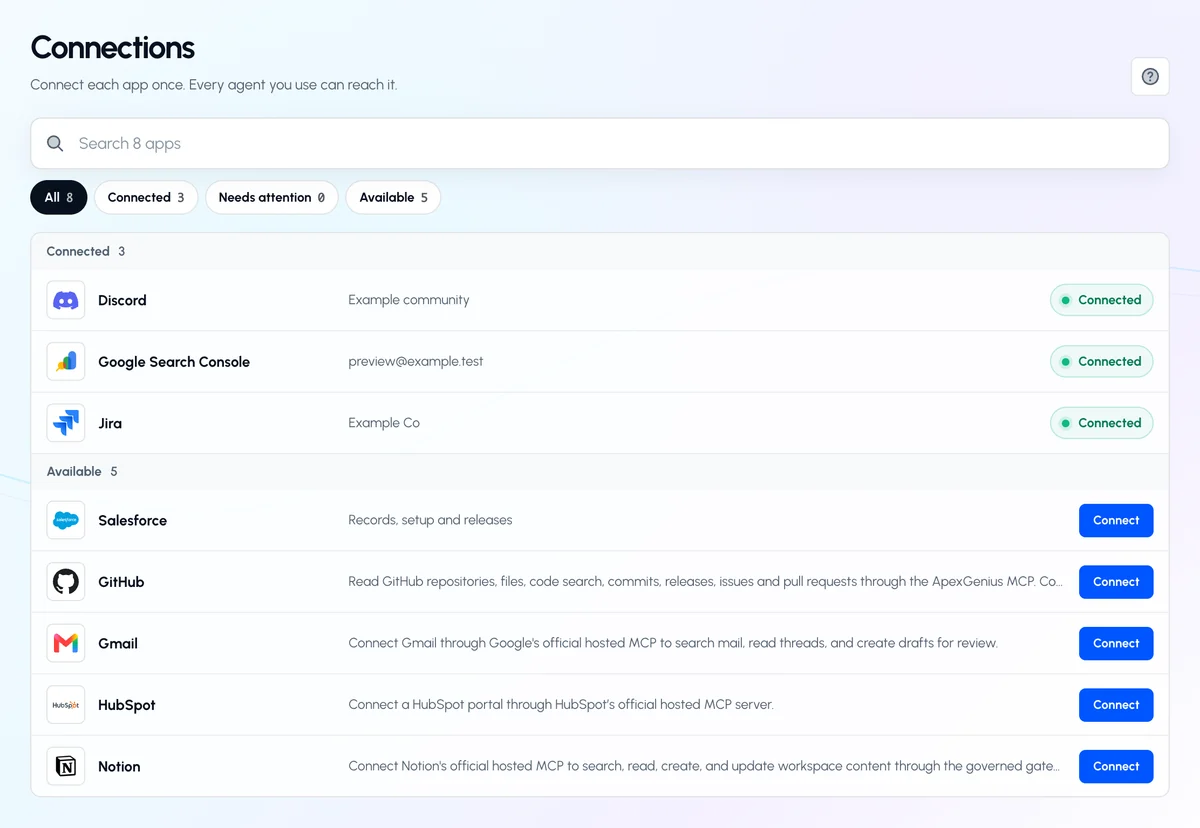
Open Connections and find GitHub. Until you connect it, its row shows Connect.Open full-size image (opens in a new tab) - Sign in to GitHub. GitHub asks which account to use. Choose Continue on the one you want and approve the ApexGenius Connect app. Nothing is pasted, and the sign-in renews itself.
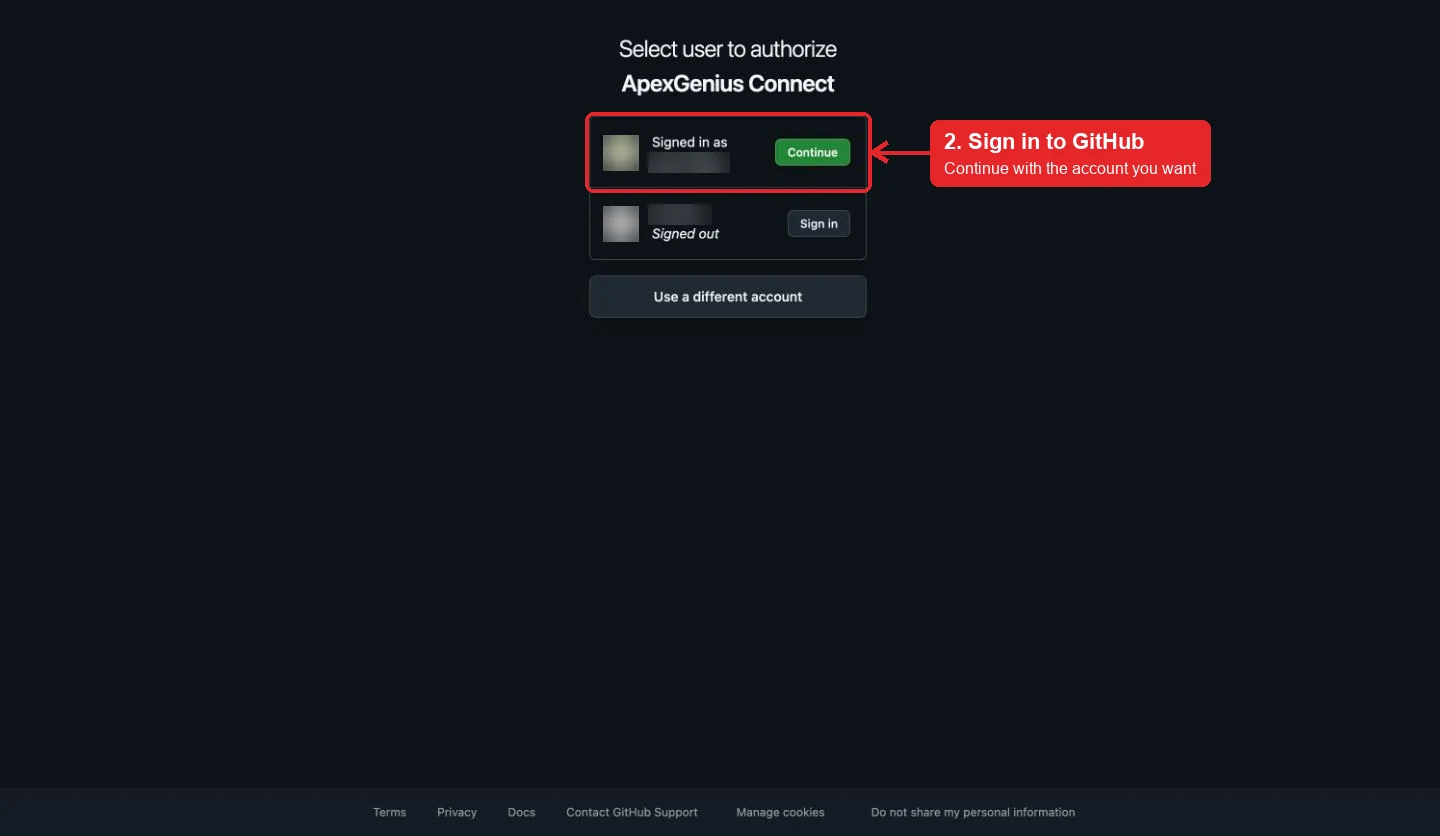
GitHub asks which account to use. Choose Continue on the one you want. Account names are blurred in this capture.Open full-size image (opens in a new tab) - Choose your repositories. Pick your account or an organization, choose Only select repositories, pick the ones your AI may use, and select Install. GitHub brings you back to ApexGenius. Add more later with Choose repos on GitHub on the connection page. An organization owner may need to approve the app.
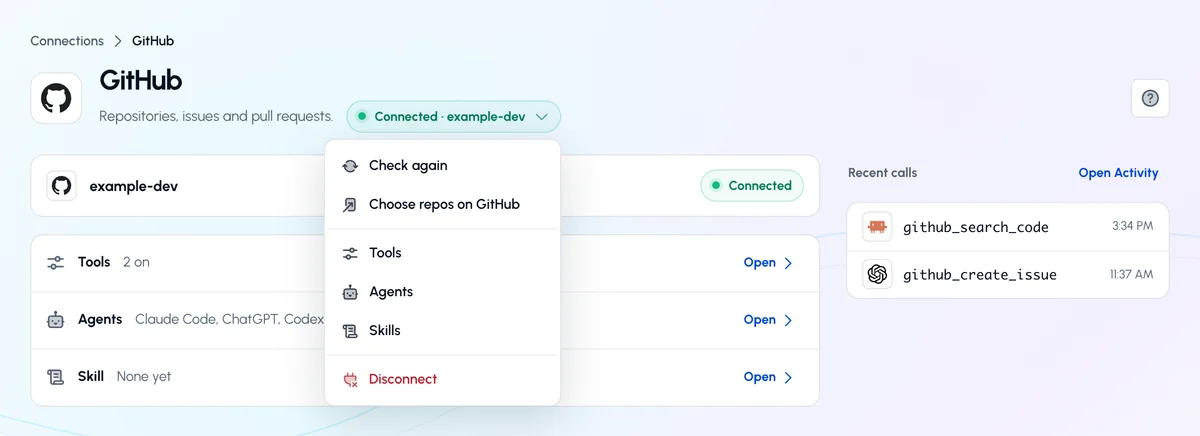
Back in ApexGenius, open the status control and choose Choose repos on GitHub to install the app on your repositories.Open full-size image (opens in a new tab) 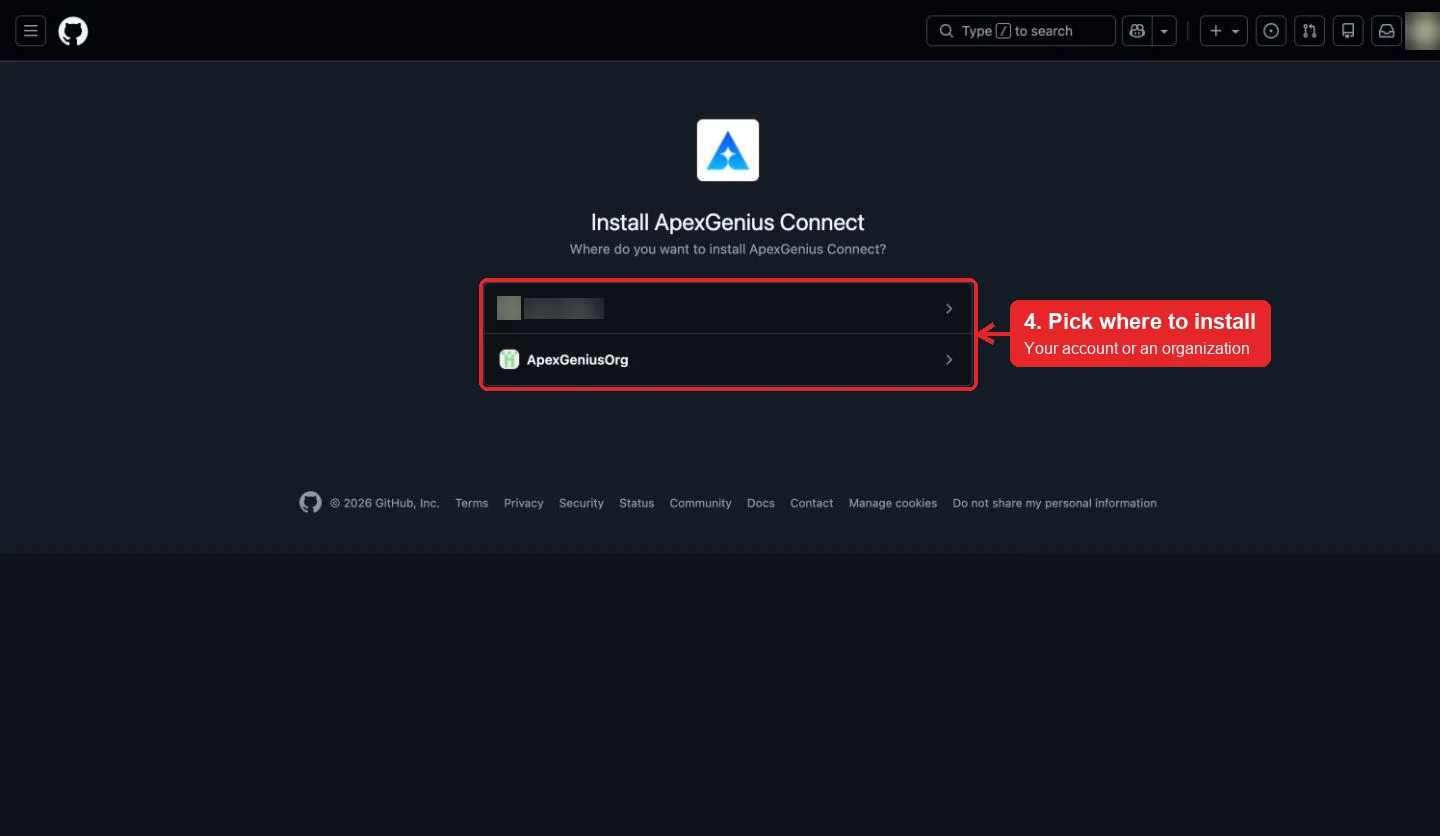
Pick your account or an organization to install the ApexGenius Connect app on.Open full-size image (opens in a new tab) 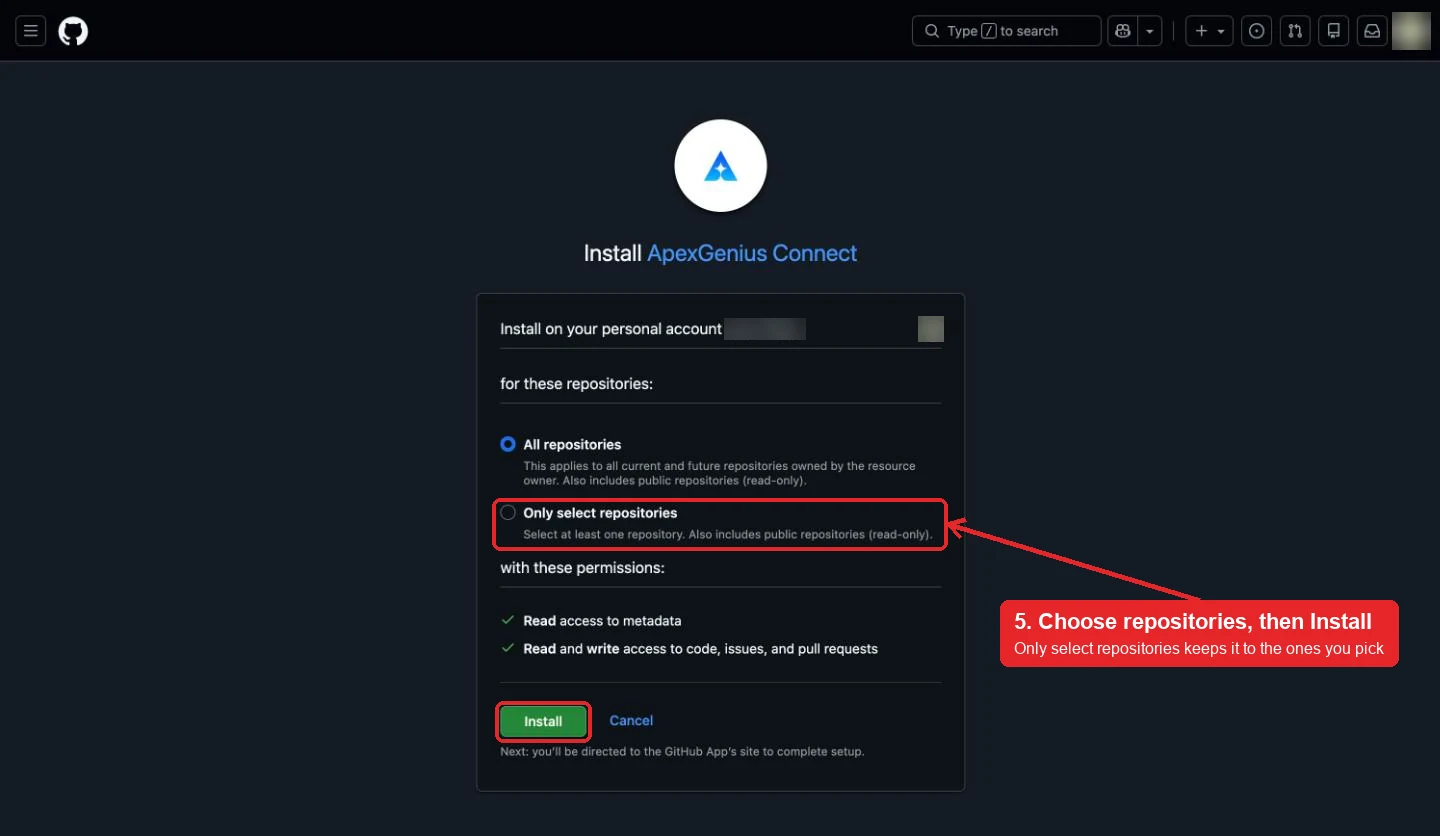
Choose Only select repositories, pick the ones your AI may use, then Install. ApexGenius keeps the connection read-only until you turn on writes.Open full-size image (opens in a new tab) - Check the connected account. Your repositories appear on the connection Overview. Ask your AI the question below and compare the login with your GitHub account.
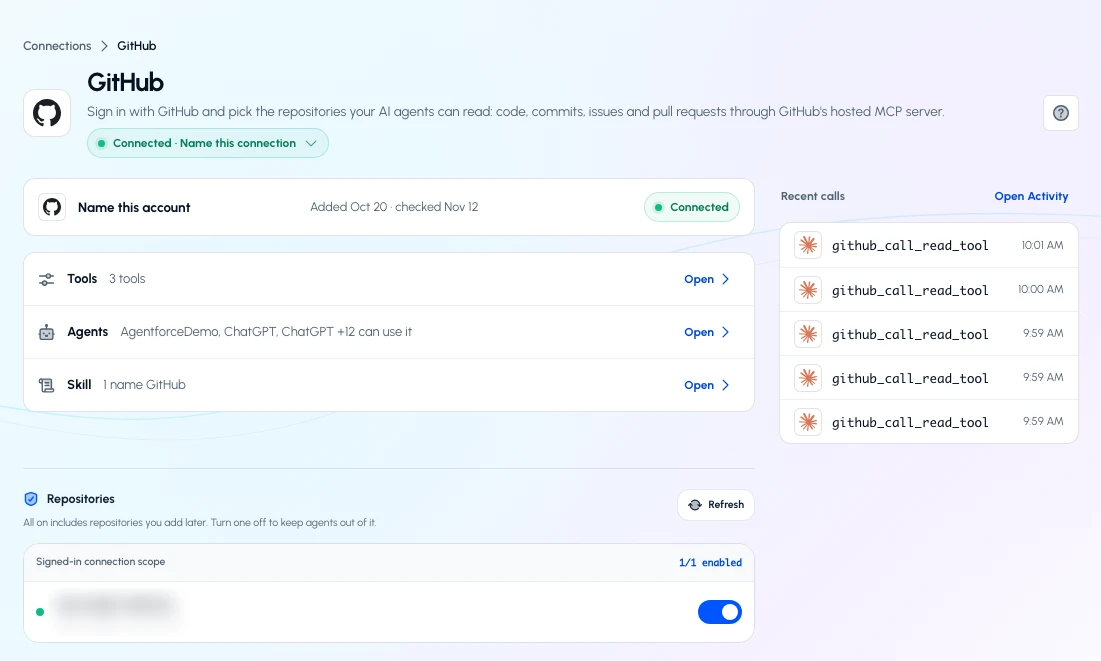
After you connect, Overview shows Connected and lists your repositories. The repository name is blurred in this capture.Open full-size image (opens in a new tab)
2. Connect ApexGenius to ChatGPT
Use this server address when adding the connection:
https://server.autom8.pro/mcpThe steps are above, under Add the ApexGenius plugin to ChatGPT. These notes apply to ChatGPT only.
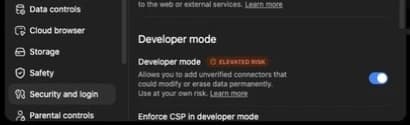
- If Add custom MCP server is missing. Account and workspace policies apply to custom MCP servers. Where ChatGPT offers Developer mode, turn it on under Settings, then Security and login. It has to be available to your account and allowed by your workspace.
- After ApexGenius adds tools. Open the connection at ChatGPT Plugins and select Refresh, then start a new conversation.
- Access. When ApexGenius asks what ChatGPT may use, choose Read only for the first test, or Custom to limit it to the tools you need.
Read the steps Follow along at your own pace
1. Enable developer mode
2. Create the plugin
3. Find ApexGenius
4. Review the connection
3. Verify one safe read
Using GitHub, tell me which GitHub account is connected, then read the README of the repository I name. Do not change anything.
Using GitHub, tell me which GitHub account is connected, then read the README of the repository I name. Do not change anything.Confirm the login matches your GitHub account and the README matches the repository on github.com. If the README is missing, install the app on that repository with Choose repos on GitHub. New connections are read-only, so this check changes nothing. To let your AI open issues or open, review and merge pull requests, open the Tools tab on the connection, choose Settings, and switch to Read and write.
Full guide: the GitHub setup guide.
What it looks like in ChatGPT Work
Illustration of a task, not a recorded customer result. Your answers come from the account and dates you choose.

apex_search_toolsGitHub account · Find GitHub readsCompleteapex_call_read_toolget_me · Read the connected accountCompleteIllustrative example: the connection belongs to the login octo-dev. Compare it with the GitHub account you meant to connect before reading a repository.
Read-only routeWhat to ask ChatGPT about GitHub
- Check the account
Which GitHub account is connected? Do not change anything.
Runs
get_me(read). - Open pull requests
Summarize the open pull requests in the repository I name, with author, age and review status.
Runs
list_pull_requests(read), thenpull_request_read(read). - Read a file
Read the config file I name on the main branch and explain what it sets.
Runs
get_file_contents(read).
These 3 questions use 4 of GitHub’s 44 operations. The full list is below.
- List the bug issues opened in the last 30 days in the repository I name. (read)
- What changed in the latest release of the repository I name? (read)
- In the repository I name, open an issue titled "Flaky checkout test" with the failure I paste, then read it back to me. (write)
What ChatGPT can do in GitHub
44 operations: 29 read, 15 write. Read looks things up and changes nothing. Writes change GitHub and run only when you turn them on.
Account and teams
3 readget_mereadRead the connected GitHub account.
get_teamsreadList the teams you belong to in organizations the connection can see.
get_team_membersreadList the members of one organization team.
Repositories and code
4 readsearch_repositoriesreadFind repositories by name, description, topic or owner.
get_file_contentsreadRead a file or list a folder on any branch, tag or commit.
search_codereadSearch code across GitHub with GitHub code search.
list_repository_collaboratorsreadList the collaborators on a repository.
Commits, branches and tags
6 readlist_commitsreadList commits on a branch.
get_commitreadRead one commit with its changed files, and the diff when asked.
search_commitsreadSearch commits by message, author or date.
list_branchesreadList the branches in a repository.
list_tagsreadList the tags in a repository.
get_tagreadRead one tag.
Releases
3 readlist_releasesreadList the releases in a repository.
get_latest_releasereadRead the latest release.
get_release_by_tagreadRead the release for one tag.
Issues
6 read · 4 writelist_issuesreadList issues in a repository, filtered by state or label.
issue_readreadRead one issue with its comments, labels, parent or sub-issues.
search_issuesreadSearch issues by meaning, such as a bug described in your own words.
get_labelreadRead one label in a repository.
list_issue_typesreadList the issue types a repository or organization supports.
list_issue_fieldsreadList the issue fields defined for a repository or organization.
issue_writewriteCreate, update, close or reopen an issue.
add_issue_commentwriteComment on an issue or pull request.
update_issue_commentwriteEdit one existing comment.
sub_issue_writewriteAdd, remove or reorder sub-issues under a parent issue.
Pull requests
3 read · 7 writelist_pull_requestsreadList pull requests in a repository.
pull_request_readreadRead one pull request with its diff, files, commits, reviews, comments or check runs.
search_pull_requestsreadSearch pull requests across repositories.
create_pull_requestwriteOpen a pull request between two branches.
merge_pull_requestwriteMerge a pull request into its target branch. A merge can trigger workflows and deployments.
update_pull_requestwriteChange a pull request’s title, body, base, reviewers or draft state.
update_pull_request_branchwriteUpdate a pull request branch with the latest base branch.
pull_request_review_writewriteCreate, submit or delete a pull request review.
add_comment_to_pending_reviewwriteAdd a line comment to a pending review.
add_reply_to_pull_request_commentwriteReply to a review comment thread.
People
1 readsearch_usersreadFind GitHub users by username or name.
GitHub Actions
3 readactions_listreadList workflows, or the runs, jobs and artifacts of one.
actions_getreadRead one workflow, run, job or artifact.
get_job_logsreadRead a job’s log, or every failed job in a run.
Branch and file writes
3 writecreate_branchwriteCreate a branch from an existing one.
create_or_update_filewriteCreate or update one file on a branch with a commit message.
push_fileswriteCommit several files to a branch in one push.
Workflow runs
1 writeactions_run_triggerwriteRun, rerun or cancel a workflow.
You choose the access. When you approve ChatGPT, pick Full access, Read only, or Custom.
GitHub checks the connection on every call. Your AI sees only the repositories the app is installed on.
Connections start read-only: ApexGenius sends GitHub’s read-only header, so write tools are not listed and cannot run. Under Settings you can switch one connection to read and write for the repositories you name; reads and writes then stay inside that list.
Manual workflow runs are off until you switch them on for a repository. A PR merge can still trigger workflows and deployments. Deleting files or run logs, and creating, deleting or forking repositories stay blocked. Every write is audited and runs when called.
An organization owner may need to approve the ApexGenius Connect app before it reaches the organization’s repositories.
Disconnecting removes the connection from ApexGenius. To stop access everywhere, uninstall the ApexGenius Connect app on GitHub.
Questions about connecting ChatGPT to GitHub
Updated November 12, 2026.
How do I connect ChatGPT to GitHub?
Connect ChatGPT to GitHub through ApexGenius in three steps. Sign in to ApexGenius and connect GitHub with your GitHub login, choosing the repositories. In ChatGPT, go to Plugins, select the plus button, then Add custom MCP server, and enter the ApexGenius MCP address under Connection. Then start a task in ChatGPT and ask a GitHub question.
How do I check that ChatGPT can use GitHub?
Start a new conversation, type @ in the prompt box and select the ApexGenius plugin. If the plugin does not list a tool you expect, open the connection at ChatGPT Plugins and select Refresh. Then ask: “Using GitHub, tell me which GitHub account is connected, then read the README of the repository I name. Do not change anything.”
Is there a GitHub MCP server for ChatGPT?
Yes. ApexGenius is an MCP server that ChatGPT connects to once. It carries your GitHub connection and 44 GitHub operations, so ChatGPT does not need a separate GitHub integration or plugin.
What can ChatGPT do in GitHub once it is connected?
ChatGPT can run 44 GitHub operations through ApexGenius: 29 reads across repositories, code, commits, branches, releases, issues, pull requests and teams, and 15 writes that open issues, comment, push branches, and open, review or merge pull requests once you turn writes on.
Can ChatGPT read my private GitHub repositories?
Yes. ChatGPT reads the private GitHub repositories you install the ApexGenius Connect app on, and nothing else. GitHub checks the installation on every call, and you add or remove repositories on GitHub at any time.
Can ChatGPT change my GitHub repositories?
Not until you turn writes on. A GitHub connection in ApexGenius starts read only. Under Settings you name the repositories and switch to read and write, and ChatGPT can then open issues, comment, push branches, and open, review or merge pull requests there. GitHub permissions and branch rules still apply. Deleting files, and creating, deleting or forking repositories are always refused.
Can I use the same GitHub connection with Claude, Grok Bot or Muse?
Yes. One GitHub connection in ApexGenius works with every compatible agent you add, including Claude, Grok Bot or Muse. Each agent gets its own access choice and its own short setup, and the GitHub skill loads in all of them.
More connections like this one
ChatGPT with other apps
 Supabase
 Cal.com
 Stripe
 Linear
 Jira
 HQ Rental
 Google Forms
 Google Tasks
All 48 apps ChatGPT can use
 Google Calendar
 Google Sheets
 Calendly
 ClickUp
 monday.com
 ElevenLabs
 FreshBooks
 Trello
 GitLab
 Mobbin
 Slack
 Discord
- ChatGPT Ads
 Context.dev
 Attio
 Semrush
 Notion
 Apify
 Google Ads
 Google Analytics
 Google Meet
 Gmail
 Google Chat
 Google Docs
 Google Drive
 Google Slides
 Apollo
 Blotato
 Bing Webmaster
 Atlassian Rovo
 Polymarket
 OP.GG
 YouTube
- YouTube Analytics
 Salesforce
 n8n
 Confluence
 Google Search Console
 TypeSafe
 HubSpot
Other agents with GitHub
 Claude
 Grok Bot
 Muse
Connect GitHub to ChatGPT today
Start free1,000 free credits. No card required. Disconnect any time.